There are various ways of running Docker containers on Android. First, Docker will not work in proot. And because Android kernel lacks the features which are required by dockers to run, even with root permission you still cannot run docker in chroot environment.
The non-rooted method of running Dockers on Android is to set up a virtual machine and install docker in it, see oofnikj - Docker on Termux in a VM. However this method is freaking slow.
In order to run Docker containers on Android without virtual machine and chroot (which means native and better performance), we must our Android phone and compile a custom kernel for it.
My Device: Sony Xperia 5 II (pdx206). LineageOS 20 (Android 13). The source code of the kernel is available on my Github repository.
1. Check kernel compatibility #
-
First I rooted my Sony Xperia 5 II. Then I installed LineageOS 20.
-
Install Termux. Then execute Moby’s script to check kernel’s compatibility o running docker.
pkg install wget tsu
wget https://raw.githubusercontent.com/moby/moby/master/contrib/check-config.sh
chmod +x check-config.sh
sed -i '1s_.*_#!/data/data/com.termux/files/usr/bin/bash_' check-config.sh
sudo ./check-config.sh- The missing configs will be displayed. Take notes of these red missing configs (especially configs under
Generally Necessary), we have to enable them during kernel compliation.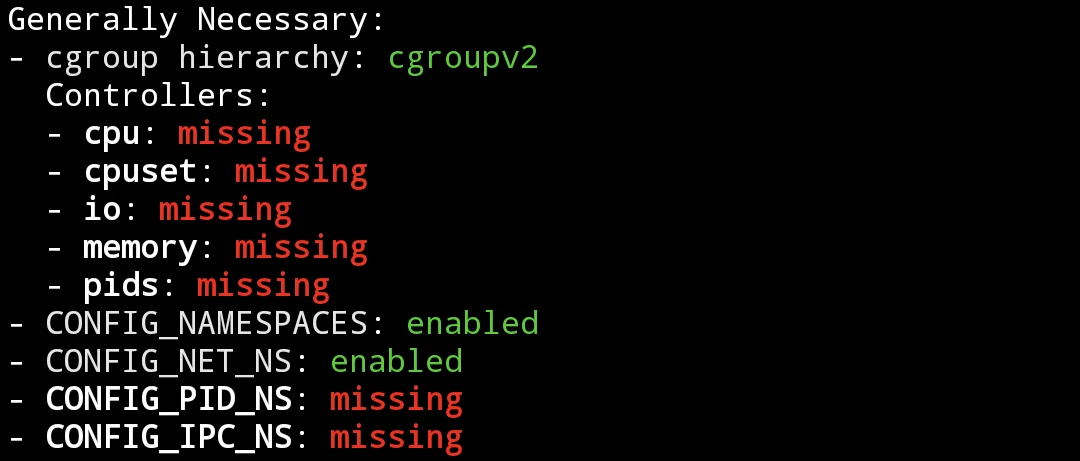
2. Compile custom Android kernel #
In 2021, I had built a docker compatible kernel for Xiaomi Redmi Note 5 Pro (whyred). But at that time I built the kernel out of source tree (standalone) and it was hardly to done for other devices. Therefore, this time I decide to build the kernel with the source tree.
There is an offcial LineageOS port of pdx206.
We need a 64-bit Linux PC to compile the kernel. Ubuntu would be a good choice, however I use Arch Linux.
First follow the steps of Build for pdx206 - LineageOS wiki.
After syncing the code of LineageOS, we can build the kernel only. A boot.img will be generated after compliation.
- Enter the compliation environment.
source build/envsetup.sh
breakfast pdx206- Go to the directory of kernel. Generate
.config
cd ~/android/lineage/kernel/sony/sm8250/
export ARCH=arm64
make pdx206_defconfig- Start menu configuration
make menuconfig-
A menu will pop up. Find the missing configs which listed in Moby’s script and enable them. Use Arrow keys to move, press Space to enable/disable configs. Don’t forget to hit Save before exit.
-
We can search the configs. For example, to find
CONFIG_IP_VS, type/and type the config name, it shall tell you where it is.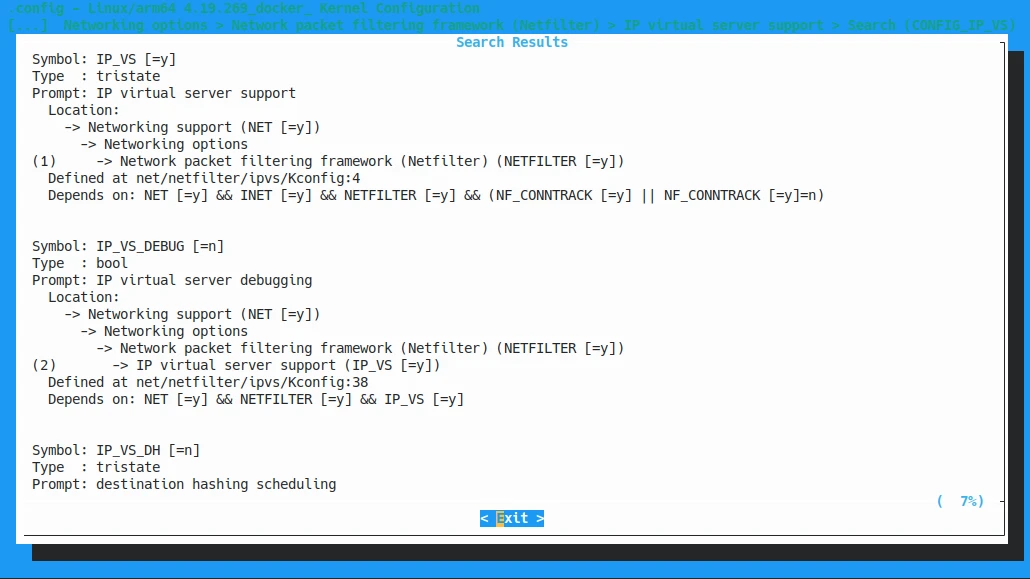
-
According to the
promptsofCONFIG_IP_VS, we know it is located at Networking Support -> Networking options -> Network packet filtering framework (Netfilter) -> IP virtual server support.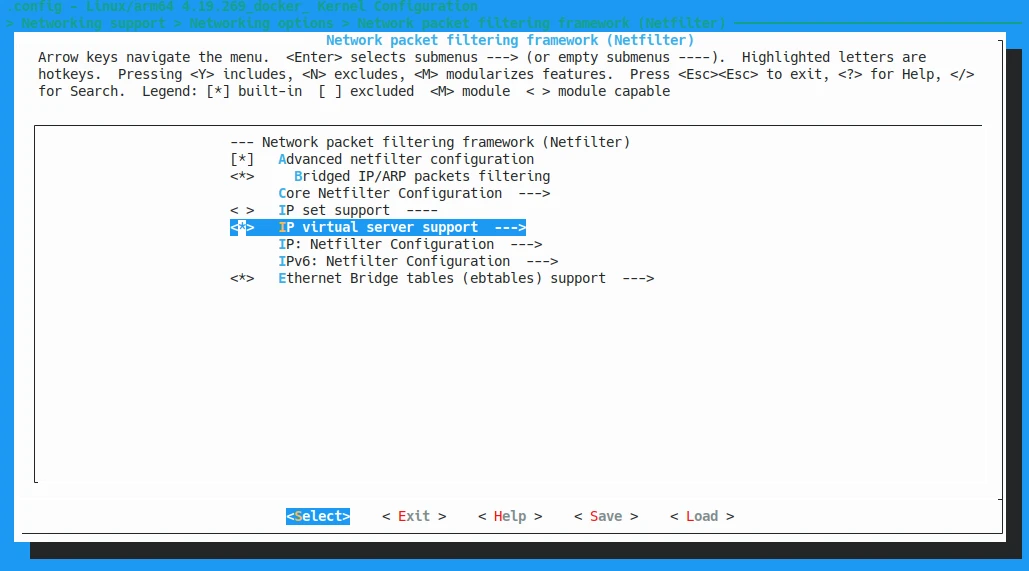
-
Some configs such as
CONFIG_CGROUP_HUGETLBare not available in Android kernel because the kernel of the device is too old. -
CONFIG_BINFMT_MISCshould also be enabled in order to run x86 apps (or docker images) on ARM. -
After enabling missing configs, we have to modify the code of
kernel/Makefile. (usepatchcommand or edit the code directly)
diff --git a/kernel/Makefile b/kernel/Makefile
index d5c1115..2dea801 100644
--- a/kernel/Makefile
+++ b/kernel/Makefile
@@ -121,7 +121,7 @@ $(obj)/configs.o: $(obj)/config_data.h
# config_data.h contains the same information as ikconfig.h but gzipped.
# Info from config_data can be extracted from /proc/config*
targets += config_data.gz
-$(obj)/config_data.gz: arch/arm64/configs/lavender_stock-defconfig FORCE
+$(obj)/config_data.gz: $(KCONFIG_CONFIG) FORCE
    $(call if_changed,gzip)

    filechk_ikconfiggz = (echo "static const char kernel_config_data[] __used = MAGIC_START"; cat $< | scripts/basic/bin2c; echo "MAGIC_END;")
- And modfiy
net/netfilter/xt_qtaguid.c:
--- orig/net/netfilter/xt_qtaguid.c     2020-05-12 12:13:14.000000000 +0300
+++ my/net/netfilter/xt_qtaguid.c       2019-09-15 23:56:45.000000000 +0300
@@ -737,7 +737,7 @@
{
        struct proc_iface_stat_fmt_info *p = m->private;
        struct iface_stat *iface_entry;
-       struct rtnl_link_stats64 dev_stats, *stats;
+       struct rtnl_link_stats64 *stats;
        struct rtnl_link_stats64 no_dev_stats = {0};
@@ -745,13 +745,8 @@
        current->pid, current->tgid, from_kuid(&init_user_ns, current_fsuid()));
        iface_entry = list_entry(v, struct iface_stat, list);
+       stats = &no_dev_stats;
-       if (iface_entry->active) {
-               stats = dev_get_stats(iface_entry->net_dev,
-                                     &dev_stats);
-       } else {
-               stats = &no_dev_stats;
-       }
        /*
         * If the meaning of the data changes, then update the fmtX
         * string.
- After that, replace original defconfig with new config
cp .config arch/arm64/configs/pdx206_defconfig- Compile the kernel. The output
boot.imgwill be located at~/android/lineage/out/target/product/pdx206/.
make clean
mka bootimage-
Docker requires root permission to run, so we send
boot.imgto the phone. Then open Magisk and click “Install” → “Patch boot.img”. Finally transfer themagisk-patched-boot.imgback to PC. -
There is no need to reflash ROM after flashing a new kernel, but we should backup the original
boot.imgin the first place in the case our phone failed to boot. -
Power off the device. Enter fastboot mode, flash
boot.img, that is it.
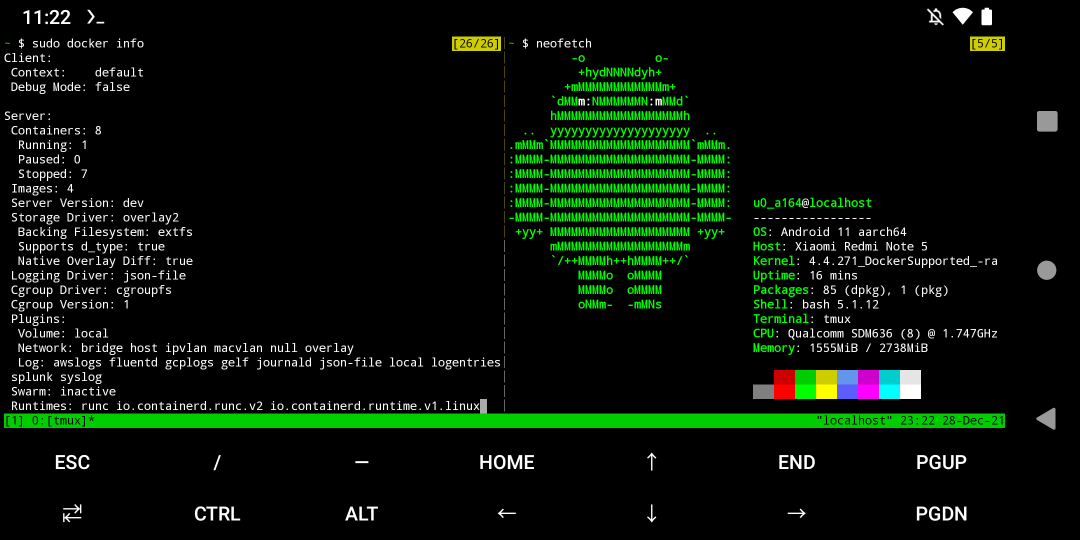
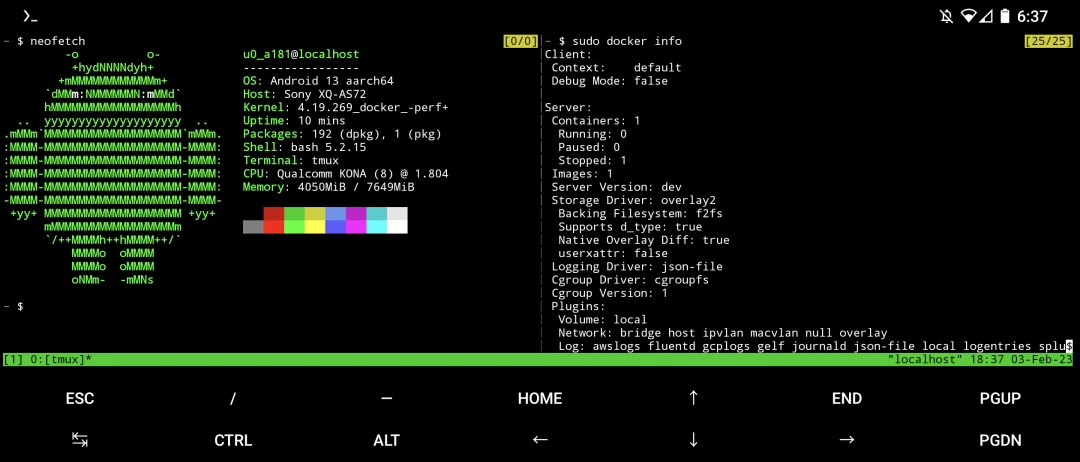
fastboot flash boot magisk-patched-boot.img3. Running Docker containers #
A message “There is an internal problem with your device” will pop up on every boot. Just ignore it.
- Open Termux, mount cgroups
sudo mount -t tmpfs -o uid=0,gid=0,mode=0755 cgroup /sys/fs/cgroup- Enable binfmt_misc
su
mount binfmt_misc -t binfmt_misc /proc/sys/fs/binfmt_misc
echo 1 > /proc/sys/fs/binfmt_misc/status-
Execute Moby’s script again:
sudo ./check-config.sh. Make sure everything turns green.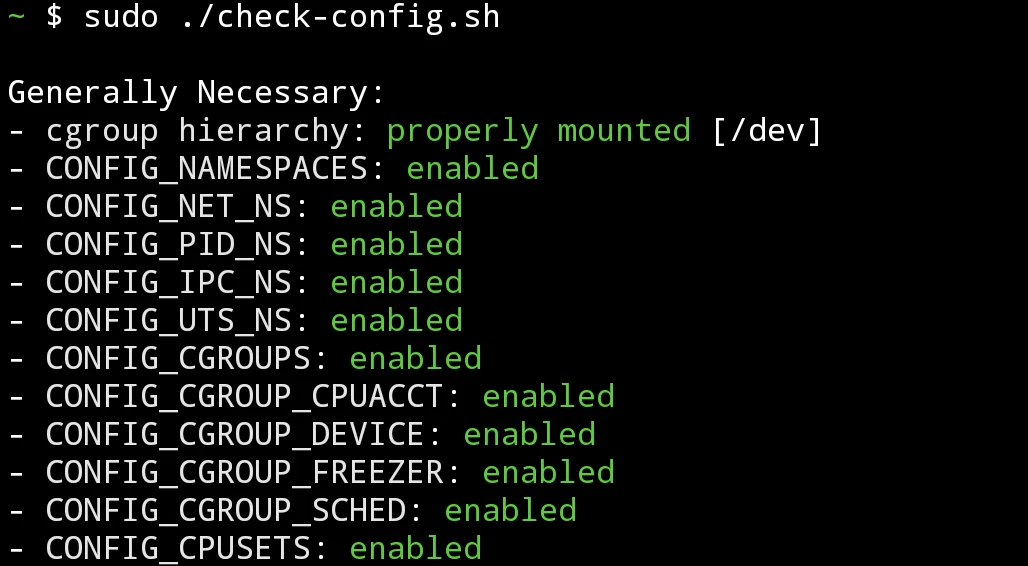
-
Install docker and docker-compose.
pkg install root-repo
pkg install docker docker-compose- Start docker daemon
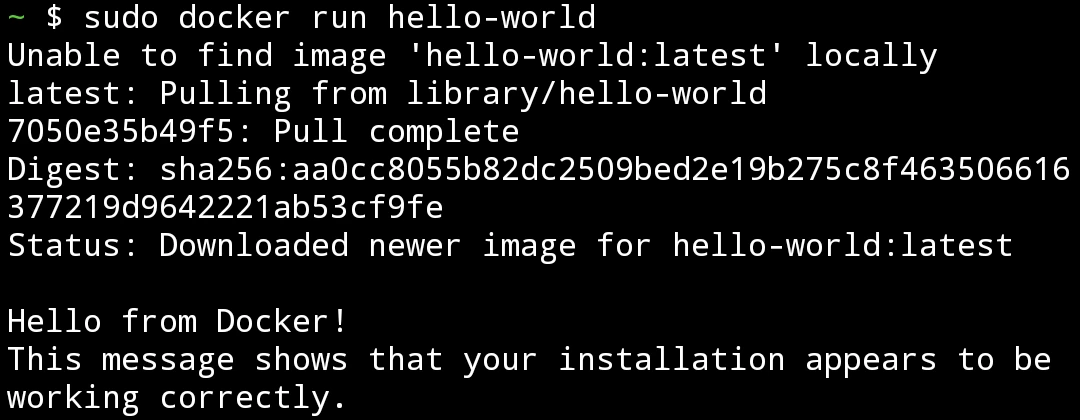
sudo dockerd --iptables=false- Swipe from left edge of the screen and open a new session. Run hello-world containers
sudo docker run hello-world-
We shall see this
-
To run docker containers with
--initarguments, installtini:
cd $TMPDIR/docker-build
wget https://github.com/krallin/tini/archive/v0.19.0.tar.gz
tar xf v0.19.0.tar.gz
cd tini-0.19.0
mkdir build
cd build
cmake -DCMAKE_BUILD_TYPE=Release -DCMAKE_INSTALL_PREFIX=$PREFIX ..
make -j8
make install
ln -s $PREFIX/bin/tini-static $PREFIX/bin/docker-init
Now try to run more containers!
Note: The docker packages had been patched by Termux developers but still not fully-functional. Currently docker-compose is broken on Termux. And while running web services, you must add --net=host --dns=8.8.8.8 arguments.
You can run qus containers for eumlating and running x86 images on ARM.
Before exiting Termux, press CTRL+C to terminate docker daemon.
4. Install Flatpak applications #
Flatpak package is not available in Termux’s repository, we have to create a chroot environment and install Flatpak in it.
-
Modfiy the starting script of chroot. Add this on the top to solve
Failed to make / slave: Invalid argumenterror
busybox mount --bind /data/local/tmp/chrootubuntu /data/local/tmp/chrootubuntu

# You may umount it manually after exiting chroot
busybox umount /data/local/tmp/chrootubuntu- Install Flatpak. Logout. Reboot the phone.
sudo apt install flatpak
flatpak remote-add --if-not-exists flathub https://flathub.org/repo/flathub.flatpakrepo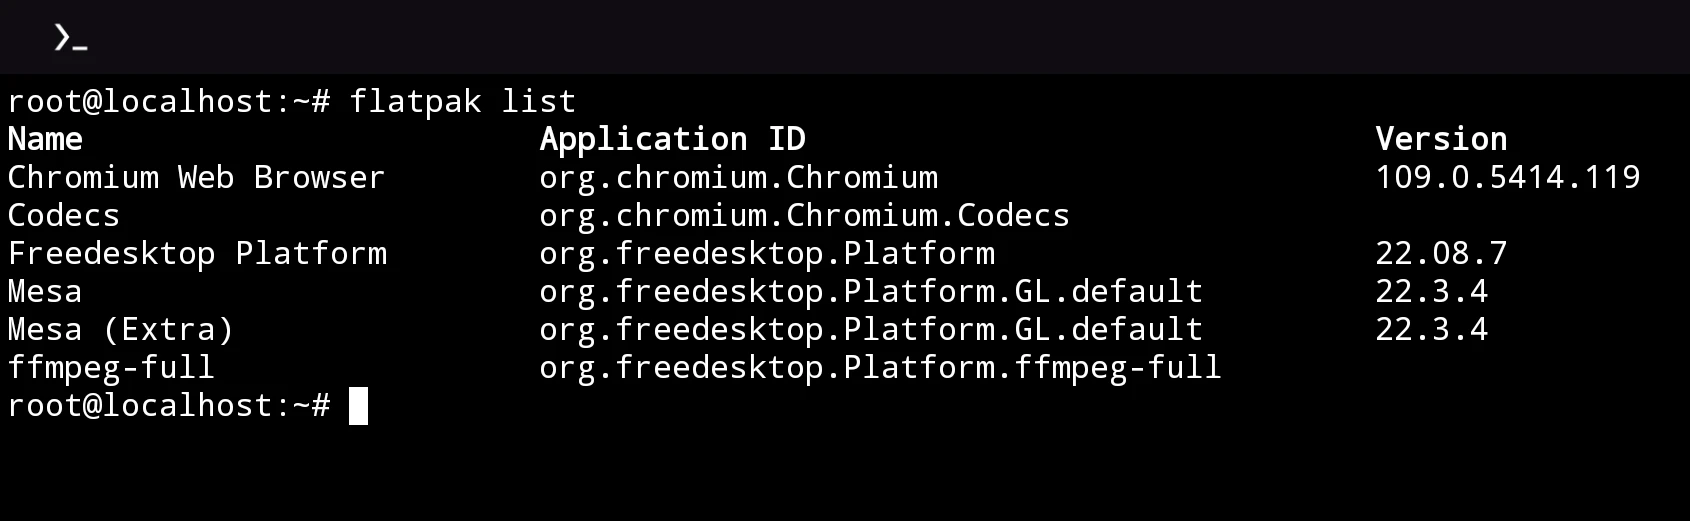
exit- Now we can install Flatpak applications. For instance
ffmpeg, which is included in Freedesktop Platform:
flatpak install org.freedesktop.Platform- Start dbus daemon before running a Flatpak application
mkdir /run/dbus
dbus-daemon --system- Before running Flatpak applications, add
--develargument to view debug info.
flatpak run --devel --command=ffmpeg org.freedesktop.Platform -version5. Run Waydroid through LXC #
Note: The installation instruction in this section is from Redditor u/Near_Earth. It has not been fully tested.
The benefits of using LXC: going beyond ordinary chroot, allowing the Android system to run things that rely on Systemd, such as Snap.
The modules used by LXC are similar to Docker, so running Flatpak and Snap is no problem. As for Waydroid, it is the real Android container that running on Android.
- Install the packages
pkg install root-repo
pkg install tsu lxc- Check if the kernel supports LXC.
sudo lxc-checkconfig- Download Ubuntu rootfs
sudo lxc-create -t download -n ubuntu -- --no-validate -d ubuntu -r jammy -a arm64- Modify configuration file
sudo sed -i '/Network configuration/,$d' "$PREFIX/var/lib/lxc/ubuntu/config"
sudo nano +-1 "$PREFIX/var/lib/lxc/ubuntu/config"- Fill in the following content
# Required Configuration
lxc.net.0.type = none
lxc.hook.version = 1
lxc.cgroup.devices.allow = a
lxc.mount.auto = cgroup:mixed sys:mixed proc:mixed

# A container that is doing nothing uses as little as some few MB of RAM.
# But when you run huge, really huge memory intensive programs or compilations, it will obviously use more RAM.
# Very, very intensive program/task == too much RAM == the LMK will free up the RAM by killing the containers.
# We don't want that.
# So we set the maximum RAM that the container is allowed to use.
# It will never go beyond this limit, so we have no more worries.
# Here, 2G = 2GB limit (can use M for MB, etc)
lxc.cgroup.memory.limit_in_bytes = 2G

# LXC does not set a default password for us, so we have to set it ourselves.
# We usually need to chroot into the container and manually set the password.
# It's boring to do this for every new container, so we will automate it.
# This one-time hook will set a temporary password called 'password' for the 'root' user and the default user (eg:- 'ubuntu').
# This is useful for newbies and you can change it later from inside the container.
# It'll run ONLY ONCE at the very first run of the container, so it won't interfere if the password is changed by the user later on.
# Temporary password for 'root' is 'password' (no quotes).
# Remember to change your password later using command 'passwd'
lxc.hook.pre-start = bash -c "echo 'Set Temporary Password'; LD_PRELOAD= chroot '${LXC_ROOTFS_PATH}' usr/bin/bash -c \"/usr/bin/echo password | /usr/bin/sed 's/.*/\0\n\0/' | /usr/bin/passwd root; /usr/bin/echo password | /usr/bin/sed 's/.*/\0\n\0/' | /usr/bin/passwd ubuntu\"; sed -i -E \"s/(.*echo 'Set Temporary Password'.*)/# \1/g\" '${LXC_CONFIG_FILE}'; true;"

# Brings Termux colors to the containers' console
lxc.environment = TERM="xterm-256color"

# This will do a bunch of important things -
# 1) Mount the required cgroups
# 2) Sets correct DNS resolver to fix connectivity
# 3) Makes non-funtional udevadm always return true, or else some packages and snaps gives errors when trying to install
# 4) Sets temporary suid for the rootfs using bind mounts, otherwise normal users inside the container won't be able to use sudo commands
lxc.hook.pre-start = bash -c "if ! mountpoint -q /sys/fs/cgroup &>/dev/null; then mkdir -p /sys/fs/cgroup; mount -t tmpfs -o rw,nosuid,nodev,noexec,relatime cgroup_root /sys/fs/cgroup; fi; for cg in blkio cpu cpuacct cpuset devices freezer memory pids; do if ! mountpoint -q /sys/fs/cgroup/\${cg} &>/dev/null; then mkdir -p /sys/fs/cgroup/\${cg}; mount -t cgroup -o rw,nosuid,nodev,noexec,relatime,\${cg} \${cg} /sys/fs/cgroup/\${cg} &>/dev/null; fi; done; mkdir -p /sys/fs/cgroup/systemd; mount -t cgroup -o none,name=systemd systemd /sys/fs/cgroup/systemd; umount -Rl /sys/fs/cgroup/cg2_bpf; umount -Rl /sys/fs/cgroup/schedtune; umount -Rl '${LXC_ROOTFS_PATH}'; sed -i -E 's/^( *# *DNS=.*|DNS=.*)/DNS=1.1.1.1/g' '${LXC_ROOTFS_PATH}/etc/systemd/resolved.conf'; mount -B '${LXC_ROOTFS_PATH}' '${LXC_ROOTFS_PATH}'; mount -i -o remount,suid '${LXC_ROOTFS_PATH}'; if [ ! -e '${LXC_ROOTFS_PATH}/usr/bin/udevadm.' ]; then mv -f '${LXC_ROOTFS_PATH}/usr/bin/udevadm' '${LXC_ROOTFS_PATH}/usr/bin/udevadm.'; fi; echo -e '#!/usr/bin/bash\n/usr/bin/udevadm. \"\$@\" || true' > '${LXC_ROOTFS_PATH}/usr/bin/udevadm'; chmod +x '${LXC_ROOTFS_PATH}/usr/bin/udevadm'; true;"

# Necessary lxc container configuration that properly sets up the containers internals. Sets up required character files, correct cgroups, etc.
lxc.hook.pre-start = bash -c 'mkdir -p '"${LXC_ROOTFS_PATH}/etc/tmpfiles.d"'; echo -e "#Type Path       Mode User Group Age Argument\nc!     /dev/cuse  0666 root root  -   10:203\nc!     /dev/fuse  0666 root root  -   10:229\nc!     /dev/ashmem  0666 root root  -   10:58\nc!     /dev/loop-control  0600 root root  -   10:237" > '"${LXC_ROOTFS_PATH}/etc/tmpfiles.d/lxc-required-setup.conf"'; for i in $(seq -s " " 0 255); do echo "b!     /dev/loop${i}  0600 root root  -   7:$((${i} * 8))" >> '"${LXC_ROOTFS_PATH}/etc/tmpfiles.d/lxc-required-setup.conf"'; done; for i in binder hwbinder vndbinder; do echo "L!     /dev/${i}  - - -  -   /dev/binderfs/anbox-${i}" >> '"${LXC_ROOTFS_PATH}/etc/tmpfiles.d/lxc-required-setup.conf"'; done; echo -e "#!/usr/bin/bash\n\nsetup_lxc_configuration(){\n\nmount -o remount,rw /sys/fs/cgroup\numount -Rl /sys/fs/cgroup/{schedtune,cpu,cpuacct,'cpu,cpuacct'} &>/dev/null\nrm -rf /sys/fs/cgroup/{schedtune,cpu,cpuacct,'cpu,cpuacct'}\nmkdir -p /sys/fs/cgroup/{cpu,cpuacct}\nfor cg in cpu cpuacct; do\n  mount -t cgroup -o rw,nosuid,nodev,noexec,relatime,\${cg} \${cg} /sys/fs/cgroup/\${cg}\ndone\nmount -o remount,ro /sys/fs/cgroup\n\numount -Rl /dev/binderfs\n\nrm -rf /dev/binderfs\nmkdir -p /dev/binderfs\nmount -t binder binder /dev/binderfs\n\n}\n\nsetup_lxc_configuration &>/dev/null || true\n" > '"${LXC_ROOTFS_PATH}/etc/rc.local"'; chmod +x '"${LXC_ROOTFS_PATH}/etc/rc.local"'; true;'

# If container stopped then umount the bind mounted rootfs and restore it's nosuid if it was set
lxc.hook.post-stop = bash -c "umount -Rl '${LXC_ROOTFS_PATH}'; true;"
lxc.hook.destroy = bash -c "umount -Rl '${LXC_ROOTFS_PATH}'; true;"- Log in to Ubuntu. The default account is
ubuntu, password ispassword.
sudo lxc-start -F -n ubuntu-
Refer to Ubuntu chroot to install the graphical environment.
-
Setup GPU acceleration through virglrenderer.