讓你體驗什麼叫做,用Arch Linux的方式裝Ubuntu。
Debootstrap是Debian研發的古老工具,用於建立最小的Linux檔案系統,Ubuntu也可以用。
跟一般用LiveUSB的安裝過程比起來,這款工具能夠讓你自行組合Ubuntu系統,對最終系統的樣子有更多選擇。你可以任意刪除、新增套件,決定系統要長怎樣。
就像自助餐,選你愛吃的菜,不要原廠那些臃腫的套件。但這也代表你得手動處理顯示卡、Wifi驅動之類的套件。
這樣作法還有個優勢,將Ubuntu安裝到任意路徑,建立chroot環境,隨時切入進去。(如果你只是想跑chroot環境,那麼你不需要準備硬碟,你只要在本機新建一個空白目錄把系統安裝進去就可以了,無需安裝GRUB和Linux核心。)
這篇文章我將在現有的Linux系統跑Debootstrap,安裝Ubuntu系統到另一個硬碟上,不需要隨身碟。
1. 分割硬碟 #
以下步驟得用Linux電腦來操作,或者你用Ubuntu的LiveUSB環境也行。
- 在目前的Linux電腦安裝debootstrap和arch-chroot套件
sudo apt install debootstrap arch-install-scripts-
將要安裝系統的硬碟插上電腦,用SATA線或外接盒都行
-
以
lsblk指令檢查硬碟路徑,例如我這裡是/dev/sdd
-
將其取消掛載
sudo umount /media/user/a05a6db1-51bb-489b-88e1-52f02dd087b7- 用fdisk分割硬碟
sudo fdisk /dev/sdd- 在硬碟上新增EFI和Root分區
# 新增GPT分割表
g

# 新增EFI分區
n
1
First Sector: (Enter)
Last Sector: +512M
t
uefi

# 將剩下的空間當作root
n
2
First Sector: (Enter)
Last Sector: (Enter)

# 寫入變更
w-
用指令
sudo fdisk -l /dev/sdd查看,最終分割區長這樣。SWAP我後面再用SWAP File補充就行了。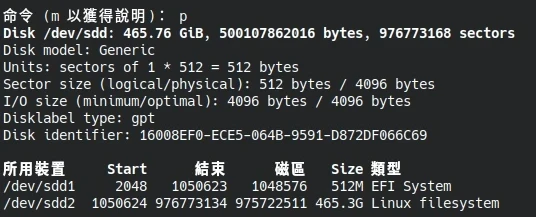
-
將硬碟格式化,建立檔案系統
sudo mkfs.vfat /dev/sdd1
sudo mkfs.ext4 /dev/sdd2- 掛載硬碟至/mnt,
sudo mount /dev/sdd2 /mnt- 再掛載EFI目錄
sudo mkdir /mnt/boot/
sudo mkdir /mnt/boot/efi
sudo mount /dev/sdd1 /mnt/boot- 啟動Debootstrap,從台灣伺服器下載檔案,建立Ubuntu 22.04 (jammy)的檔案系統,寫入到/mnt
sudo debootstrap jammy /mnt http://tw.archive.ubuntu.com/ubuntu- 用genfstab寫入現有的掛載狀況至fstab
genfstab -U -p /mnt | sudo tee /mnt/etc/fstab- 檢查fstab內容
cat /mnt/etc/fstab- chroot到Ubuntu系統
sudo arch-chroot /mnt- 建立SWAP File,建議是RAM的二倍大小,我這裡是8GB
dd if=/dev/zero of=/swapfile bs=1M count=8k status=progress

chmod 0600 /swapfile

mkswap -U clear /swapfile

swapon /swapfile
2. 安裝Linux核心 #
- 首先,編輯/etc/apt/sources.list
apt install vim

vim /etc/apt/sources.list- 補上main、restricted、universe的套件庫
deb [trusted=yes]  http://tw.archive.ubuntu.com/ubuntu jammy          main restricted universe
deb [trusted=yes]  http://tw.archive.ubuntu.com/ubuntu jammy-security  main restricted universe
deb [trusted=yes] http://tw.archive.ubuntu.com/ubuntu jammy-updates main restricted universe- 安裝Linux核心,選用HWE版本。
--no-install-recommends是為了防止裝到多餘的套件
apt update
apt upgrade
apt install --no-install-recommends linux-image-generic-hwe-22.04 linux-headers-generic-hwe-22.04 linux-firmware initramfs-tools efibootmgr
3. 安裝桌面環境 #
桌面環境一個套件就夠了,Ubuntu已經貼心的打包好,ubuntu-desktop即為預設的GNOME桌面和附屬應用程式
apt install ubuntu-desktop你也可以改裝:
kubuntu-desktop:KDE桌面
xubuntu-desktop:XFCE桌面
lubuntu-desktop:Lubuntu桌面
4. 設定語言、新增一般使用者 #
- 設定主機名稱
echo "Ubuntu" > /etc/hostname
echo "127.0.0.1 localhost" >> /etc/hosts
echo "::1 localhost" >> /etc/hosts
echo "127.0.1.1 Ubuntu" >> /etc/hosts- 安裝正體中文套件
sudo apt install language-pack-zh-hant- 依序設定時區(選Asia/Taipei)、語言(選zh_TW.UTF-8)、鍵盤配置(維持預設)
dpkg-reconfigure tzdata
dpkg-reconfigure locales
dpkg-reconfigure keyboard-configuration-
安裝Fcitx5輸入法框架。或者成功開機後再裝。
-
修改Root密碼
passwd- 新增一般使用者「user」
useradd -m -g users -G audio,video -s /bin/bash user
passwd user- 用指令編輯sudoers:
vim /etc/sudoers,賦予一般使用者sudo權限
#在"root ALL=(ALL:ALL) ALL"的下一行加入以下內容:
user ALL=(ALL:ALL) ALL
5. 設定系統服務與GRUB #
- 設定開機自動啟動GDM、NetworkManager
systemctl enable gdm.service
systemctl enable NetworkManager.service- 安裝GRUB至
/dev/sdd
apt install grub-efi-amd64

grub-install /dev/sdd

grub-mkconfig -o /boot/grub/grub.cfg- 退出chroot,取消掛載
exit

sudo umount /mnt/boot

sudo umount /mnt/- 電腦重開機,進入UEFI,選取Ubuntu的選項開機。