中華民國一百一十二年二月三日晨,解衣欲睡,夜色入戶,欣然起行,編譯核心。
Android核心跟GNU/Linux有差距,因此有Root也無法跑Docker。
在XDA終於有人移植新版LineageOS後,利用其核心原始碼為基礎,給Sony Xperia 5 II(pdx206)手機編譯自訂核心,使其能以原生效能跑Docker。
搞那麼大功夫就為了跑Docker?但少閒人如吾者耳。
除了跑Docker外,後面再試試跑Flatpak、LXC、Waydroid。
1. 前置作業 #
-
將Xperia 5 II 刷成LineageOS 20,並將其Root。
-
安裝Termux並初始化。
-
下載Moby的指令稿用於檢查核心缺少的功能
pkg install wget tsu
wget https://raw.githubusercontent.com/moby/moby/master/contrib/check-config.sh
chmod +x check-config.sh
sed -i '1s_.*_#!/data/data/com.termux/files/usr/bin/bash_' check-config.sh
sudo ./check-config.sh- 將CONFIG顯示為紅字的項目記下來。
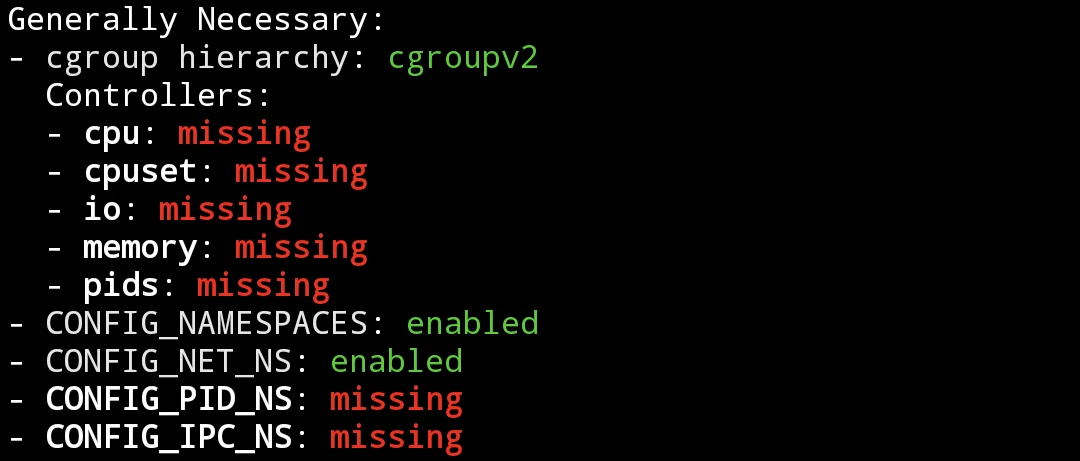
Generally Necessary下的項目是一定要開啟的設定檔;Optional Features為可開可不開。
保險起見還是盡量全開,但我可以告訴你的是,ZFS到現在(6.1.9)都還沒進入Linux主線核心,所以這設定檔是開不了的。
2. 修改核心 #
2021年曾經給紅米Note 5製作過能跑Docker的核心,但當時是使用獨立編譯核心的方式,失敗率很高。因此這次我就採用跟著原始碼樹一起編譯核心的作法。
-
參考此文下載50GB左右的LineageOS 20原始碼。
-
跳到該文的「編譯Linux核心」段落。
-
進入編譯環境。
source build/envsetup.sh
breakfast pdx206- 修改核心設定檔,切換至
~/android/lineage/kernel/sony/sm8250/目錄,以pdx206_defconfig產生.config。
export ARCH=arm64
make pdx206_defconfig- 進入核心設定檔選單,開始修改核心設定檔
make menuconfig-
對照Moby指令稿顯示紅字缺少的CONFIG,將其一一開啟。用上下鍵盤移動,選中下方Exit返回上一頁(退出時記得選Save),Enter確認,空白鍵選取。
-
例如要找
IP_VS這個CONFIG,按/,搜尋,接著它會告訴你具體位置。有些CONFIG需要先滿足Depends on寫的CONFIG條件才會出現。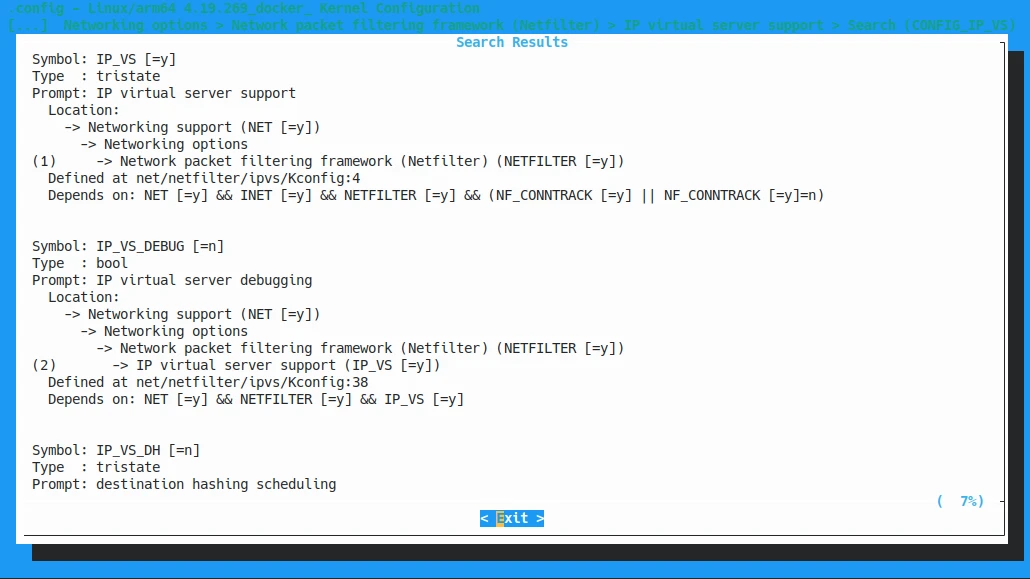
-
按照prompt去找,像
CONFIG_IP_VS位於Networking Support -> Networking options -> Network packet filtering framework (Netfilter) -> IP virtual server support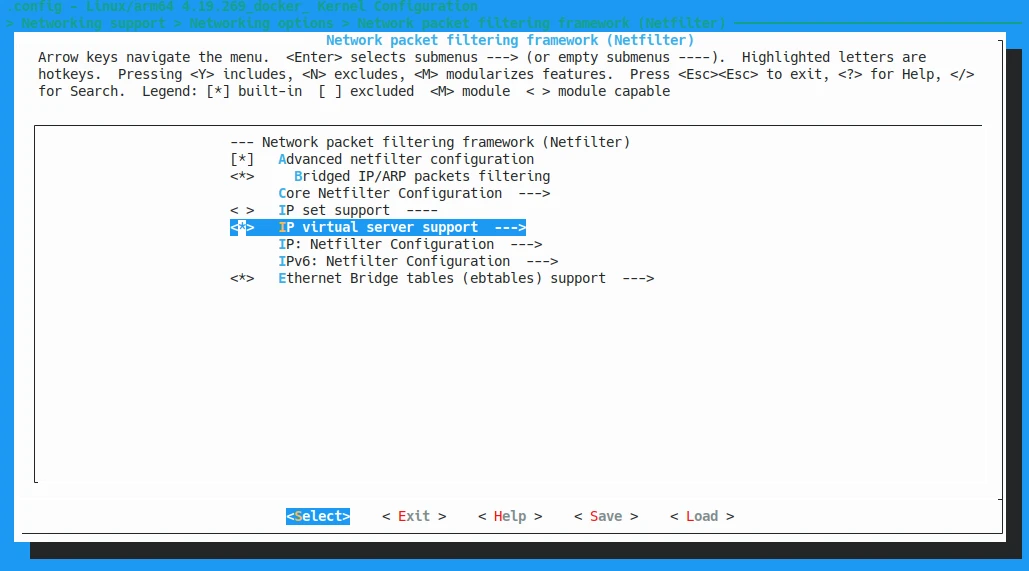
-
有些功能低版本核心找不到就是找不到,例如
CONFIG_CGROUP_HUGETLB要Linux 4.2以上核心才有,如果該設定檔沒有列在Generally Necessary就不用太緊張。 -
我另外啟用了
CONFIG_BINFMT_MISC設定檔,方便跑跨架構的應用程式。 -
根據Frederico Oliveira的文章,需要修改核心原始碼目錄下的
kernel/Makefile為以下內容。可用patch程式套用,或手動改原始碼。
diff --git a/kernel/Makefile b/kernel/Makefile
index d5c1115..2dea801 100644
--- a/kernel/Makefile
+++ b/kernel/Makefile
@@ -121,7 +121,7 @@ $(obj)/configs.o: $(obj)/config_data.h
# config_data.h contains the same information as ikconfig.h but gzipped.
# Info from config_data can be extracted from /proc/config*
targets += config_data.gz
-$(obj)/config_data.gz: arch/arm64/configs/lavender_stock-defconfig FORCE
+$(obj)/config_data.gz: $(KCONFIG_CONFIG) FORCE
    $(call if_changed,gzip)

    filechk_ikconfiggz = (echo "static const char kernel_config_data[] __used = MAGIC_START"; cat $< | scripts/basic/bin2c; echo "MAGIC_END;")
- 接著修改
net/netfilter/xt_qtaguid.c為以下內容:
--- orig/net/netfilter/xt_qtaguid.c     2020-05-12 12:13:14.000000000 +0300
+++ my/net/netfilter/xt_qtaguid.c       2019-09-15 23:56:45.000000000 +0300
@@ -737,7 +737,7 @@
{
        struct proc_iface_stat_fmt_info *p = m->private;
        struct iface_stat *iface_entry;
-       struct rtnl_link_stats64 dev_stats, *stats;
+       struct rtnl_link_stats64 *stats;
        struct rtnl_link_stats64 no_dev_stats = {0};
@@ -745,13 +745,8 @@
        current->pid, current->tgid, from_kuid(&init_user_ns, current_fsuid()));
        iface_entry = list_entry(v, struct iface_stat, list);
+       stats = &no_dev_stats;
-       if (iface_entry->active) {
-               stats = dev_get_stats(iface_entry->net_dev,
-                                     &dev_stats);
-       } else {
-               stats = &no_dev_stats;
-       }
        /*
         * If the meaning of the data changes, then update the fmtX
         * string.
- 修改完成後,用
.config取代原本的pdx206_defconfig。下一步make clean後.config會被刪除。
cp .config arch/arm64/configs/pdx206_defconfig- 編譯核心
make clean
mka bootimage-
輸出的
boot.img位於~/android/lineage/out/target/product/pdx206/。如果需要多次重複編譯,可以只刪這裡的檔案。 -
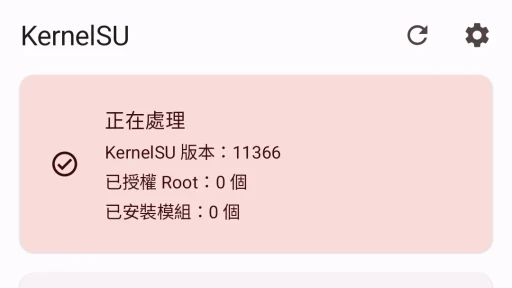
Docker需要Root權限才能跑,所以要將
boot.img傳到手機,開啟Magisk選取修補boot.img,再將修補後的magisk-boot.img傳回電腦。 -
使用fastboot將修補好的
magisk-boot.img刷到手機。我另外將編譯好的成品放到了Github。
fastboot flash boot magisk-boot.img3. 執行Docker容器 #
開機後顯示:「你的裝置發生內部問題」是正常現象。
- 開啟Termux,手動掛載cgroup
sudo mount -t tmpfs -o uid=0,gid=0,mode=0755 cgroup /sys/fs/cgroup- 這次編譯的時候也順便開啟了binfmt設定檔,也許chroot的時候會用到,將其啟用:
su
mount binfmt_misc -t binfmt_misc /proc/sys/fs/binfmt_misc
echo 1 > /proc/sys/fs/binfmt_misc/status-
再次執行Moby指令稿:
sudo ./check-config.sh,查看CONFIG是否都變成綠字。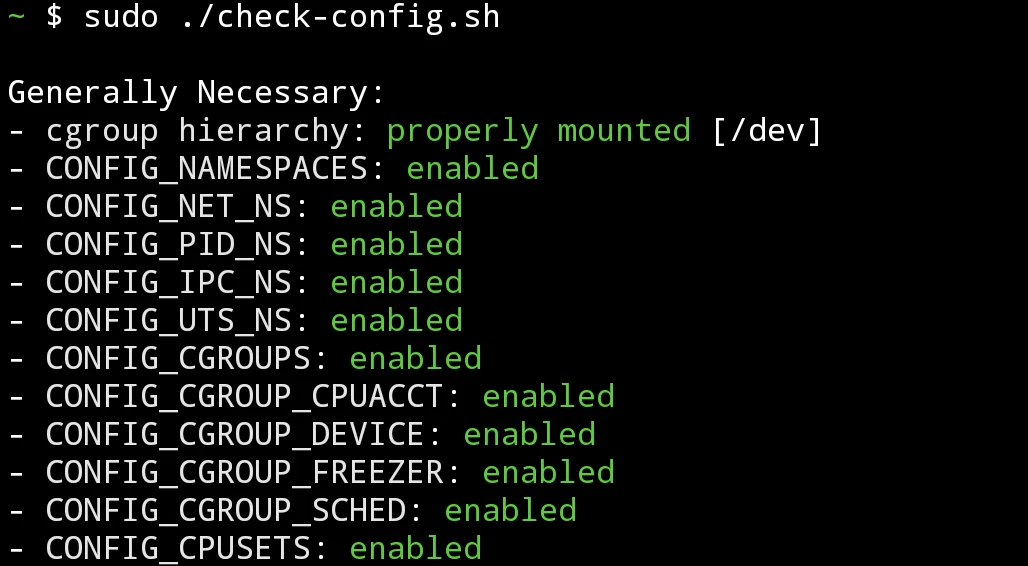
-
安裝Docker與Docker compose。目前Termux還沒收podman,也許可以用chroot或proot安裝?
pkg install root-repo
pkg install docker docker-compose- 啟動Docker daemon
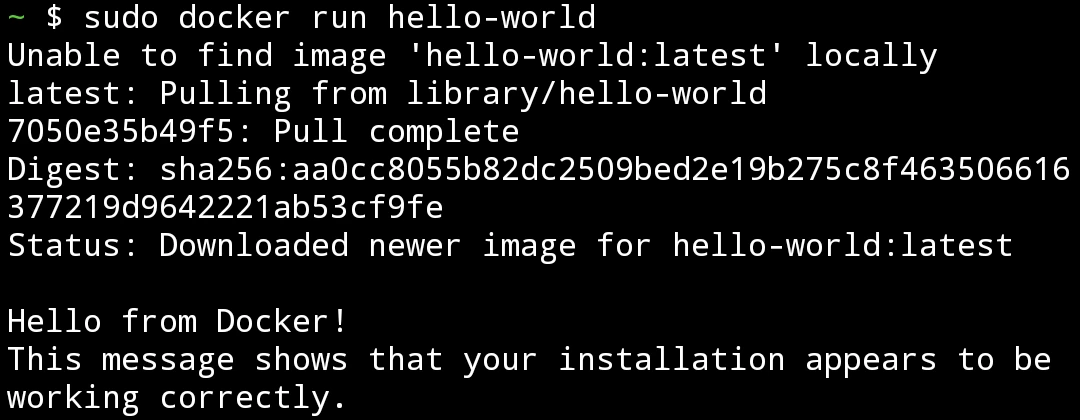
sudo dockerd --iptables=false- 從螢幕左側滑進來,按New Session開啟新終端機。測試Hello World:
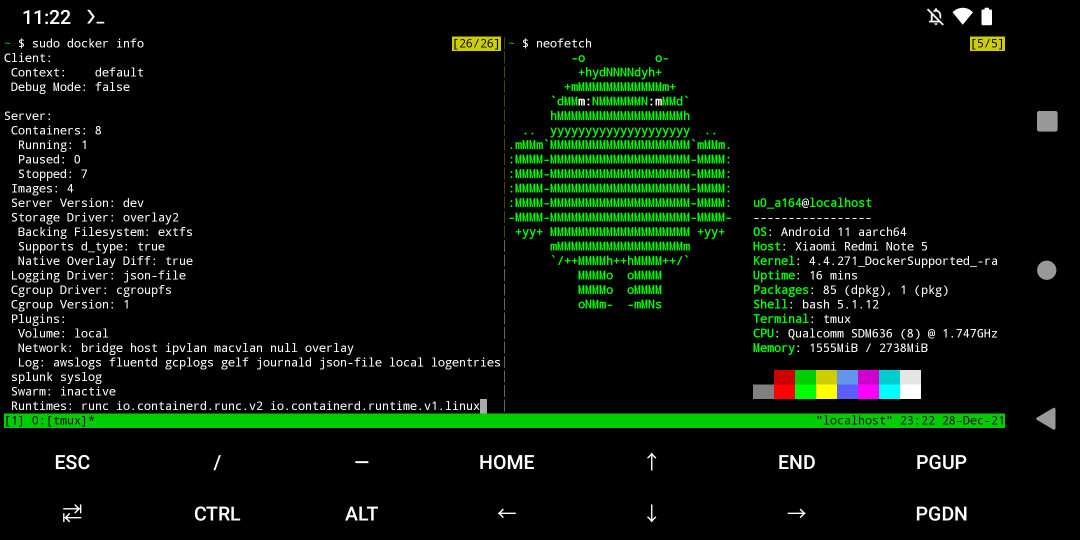
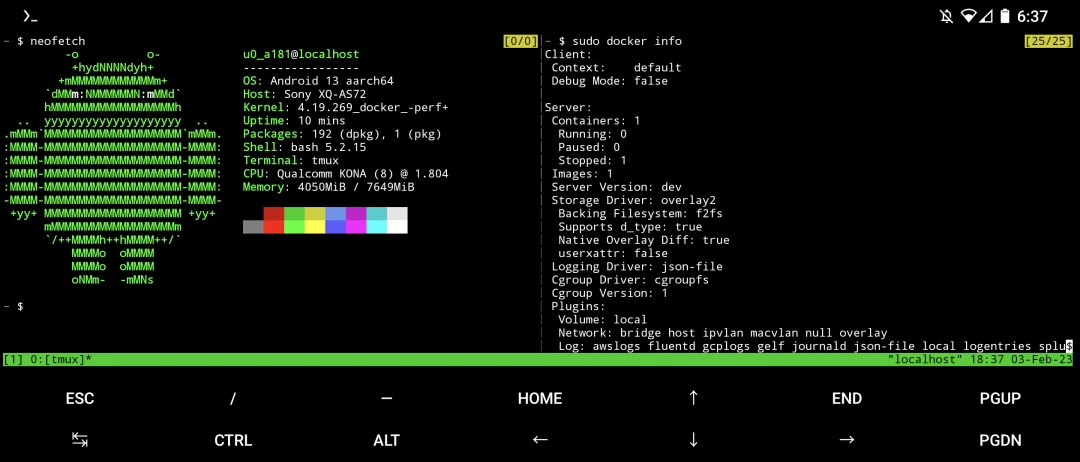
sudo docker run hello-world-
應該會看到如下輸出
-
如果映像檔需要使用
--init引數,那麼得編譯安裝tini:
cd $TMPDIR/docker-build
wget https://github.com/krallin/tini/archive/v0.19.0.tar.gz
tar xf v0.19.0.tar.gz
cd tini-0.19.0
mkdir build
cd build
cmake -DCMAKE_BUILD_TYPE=Release -DCMAKE_INSTALL_PREFIX=$PREFIX ..
make -j8
make install
ln -s $PREFIX/bin/tini-static $PREFIX/bin/docker-init測試成功之後,就可以在手機跑Docker容器了!可以嘗試跑Linux容器、伺服器服務、轉檔工具等等,也可以跑圖形界面再裝Box86 + Wine。
如果映像檔只支援x86架構,在編譯binfmt後參考此篇解決。
目前Termux的Docker還有些缺陷,例如無法使用itptables、只能使用host網路(加上--net=host --dns=8.8.8.8引數)、docker-compose無法使用等問題。
關閉Docker前務必在Docker daemon的終端機按CTRL+C取消執行。
4. 安裝Flatpak應用程式 #
Docker需要的cgroups同時也能用來跑Flatpak應用程式。Flatpak是跨發行版的打包套件格式,可以輕鬆解決依賴問題。
chroot環境只要做些修改就可以跑Flatpak APP。
-
Termux沒有收Flatpak套件,因此要先設定chroot Ubuntu環境。
-
修改登入Ubuntu的指令稿,在最前面加入掛載自身目錄的指令,防止出現
Failed to make / slave: Invalid argument的bug。
# 加入至頁首
busybox mount --bind /data/local/tmp/chrootubuntu /data/local/tmp/chrootubuntu

# 加入至末尾
busybox umount /data/local/tmp/chrootubuntu- 登入Ubuntu,安裝Flatpak,然後登出Ubuntu,手機重開機。
sudo apt install flatpak
flatpak remote-add --if-not-exists flathub https://flathub.org/repo/flathub.flatpakrepo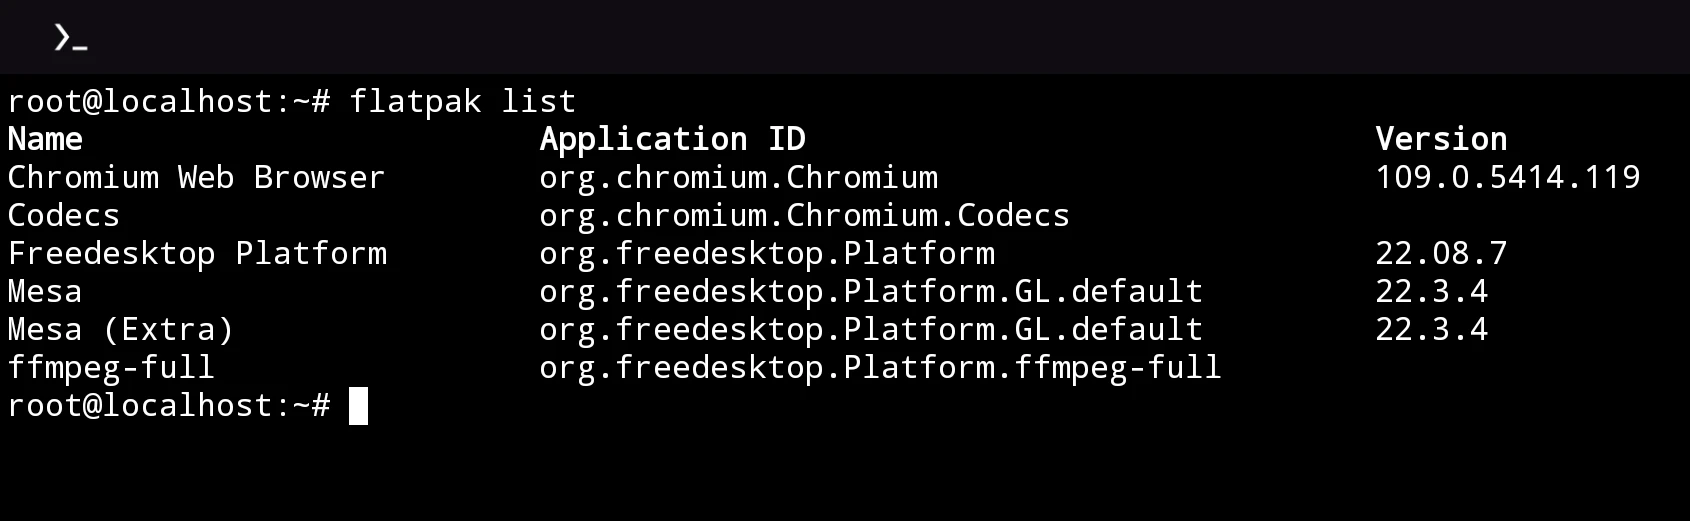
exit- 重新登入chroot Ubuntu,便可安裝Flaptak的應用程式,例如ffmpeg:
flatpak install org.freedesktop.Platform- 執行Flatpak應用程式前要先啟動dbus:
mkdir /run/dbus
dbus-daemon --system- 執行Flatpak應用程式可加上
--devel看除錯輸出。
flatpak run --devel --command=ffmpeg org.freedesktop.Platform -version5. 透過LXC跑Waydroid #
註:本段內容來自Reddit用戶u/Near_Earth,尚未經過完整測試。
使用LXC的好處:超越一般的chroot,讓Android系統可以跑依賴Systemd的東西,例如Snap。
LXC用到的核心模組跟Docker有關,因此跑Flatpak和Snap也是沒問題的。Waydroid則是能在Android上跑真正的Android容器。
- 安裝套件
pkg install  root-repo
pkg install tsu lxc- 確認核心對LXC的支援度。
sudo lxc-checkconfig- 下載Ubuntu rootfs
sudo lxc-create -t download -n ubuntu -- --no-validate -d ubuntu -r jammy -a arm64- 修改設定檔
sudo sed -i '/Network configuration/,$d' "$PREFIX/var/lib/lxc/ubuntu/config"
sudo nano +-1 "$PREFIX/var/lib/lxc/ubuntu/config"- 填入以下內容
# Required Configuration
lxc.net.0.type = none
lxc.hook.version = 1
lxc.cgroup.devices.allow = a
lxc.mount.auto = cgroup:mixed sys:mixed proc:mixed

# A container that is doing nothing uses as little as some few MB of RAM.
# But when you run huge, really huge memory intensive programs or compilations, it will obviously use more RAM.
# Very, very intensive program/task == too much RAM == the LMK will free up the RAM by killing the containers.
# We don't want that.
# So we set the maximum RAM that the container is allowed to use.
# It will never go beyond this limit, so we have no more worries.
# Here, 2G = 2GB limit (can use M for MB, etc)
lxc.cgroup.memory.limit_in_bytes = 2G

# LXC does not set a default password for us, so we have to set it ourselves.
# We usually need to chroot into the container and manually set the password.
# It's boring to do this for every new container, so we will automate it.
# This one-time hook will set a temporary password called 'password' for the 'root' user and the default user (eg:- 'ubuntu').
# This is useful for newbies and you can change it later from inside the container.
# It'll run ONLY ONCE at the very first run of the container, so it won't interfere if the password is changed by the user later on.
# Temporary password for 'root' is 'password' (no quotes).
# Remember to change your password later using command 'passwd'
lxc.hook.pre-start = bash -c "echo 'Set Temporary Password'; LD_PRELOAD= chroot '${LXC_ROOTFS_PATH}' usr/bin/bash -c \"/usr/bin/echo password | /usr/bin/sed 's/.*/\0\n\0/' | /usr/bin/passwd root; /usr/bin/echo password | /usr/bin/sed 's/.*/\0\n\0/' | /usr/bin/passwd ubuntu\"; sed -i -E \"s/(.*echo 'Set Temporary Password'.*)/# \1/g\" '${LXC_CONFIG_FILE}'; true;"

# Brings Termux colors to the containers' console
lxc.environment = TERM="xterm-256color"

# This will do a bunch of important things -
# 1) Mount the required cgroups
# 2) Sets correct DNS resolver to fix connectivity
# 3) Makes non-funtional udevadm always return true, or else some packages and snaps gives errors when trying to install
# 4) Sets temporary suid for the rootfs using bind mounts, otherwise normal users inside the container won't be able to use sudo commands
lxc.hook.pre-start = bash -c "if ! mountpoint -q /sys/fs/cgroup &>/dev/null; then mkdir -p /sys/fs/cgroup; mount -t tmpfs -o rw,nosuid,nodev,noexec,relatime cgroup_root /sys/fs/cgroup; fi; for cg in blkio cpu cpuacct cpuset devices freezer memory pids; do if ! mountpoint -q /sys/fs/cgroup/\${cg} &>/dev/null; then mkdir -p /sys/fs/cgroup/\${cg}; mount -t cgroup -o rw,nosuid,nodev,noexec,relatime,\${cg} \${cg} /sys/fs/cgroup/\${cg} &>/dev/null; fi; done; mkdir -p /sys/fs/cgroup/systemd; mount -t cgroup -o none,name=systemd systemd /sys/fs/cgroup/systemd; umount -Rl /sys/fs/cgroup/cg2_bpf; umount -Rl /sys/fs/cgroup/schedtune; umount -Rl '${LXC_ROOTFS_PATH}'; sed -i -E 's/^( *# *DNS=.*|DNS=.*)/DNS=1.1.1.1/g' '${LXC_ROOTFS_PATH}/etc/systemd/resolved.conf'; mount -B '${LXC_ROOTFS_PATH}' '${LXC_ROOTFS_PATH}'; mount -i -o remount,suid '${LXC_ROOTFS_PATH}'; if [ ! -e '${LXC_ROOTFS_PATH}/usr/bin/udevadm.' ]; then mv -f '${LXC_ROOTFS_PATH}/usr/bin/udevadm' '${LXC_ROOTFS_PATH}/usr/bin/udevadm.'; fi; echo -e '#!/usr/bin/bash\n/usr/bin/udevadm. \"\$@\" || true' > '${LXC_ROOTFS_PATH}/usr/bin/udevadm'; chmod +x '${LXC_ROOTFS_PATH}/usr/bin/udevadm'; true;"

# Necessary lxc container configuration that properly sets up the containers internals. Sets up required character files, correct cgroups, etc.
lxc.hook.pre-start = bash -c 'mkdir -p '"${LXC_ROOTFS_PATH}/etc/tmpfiles.d"'; echo -e "#Type Path       Mode User Group Age Argument\nc!     /dev/cuse  0666 root root  -   10:203\nc!     /dev/fuse  0666 root root  -   10:229\nc!     /dev/ashmem  0666 root root  -   10:58\nc!     /dev/loop-control  0600 root root  -   10:237" > '"${LXC_ROOTFS_PATH}/etc/tmpfiles.d/lxc-required-setup.conf"'; for i in $(seq -s " " 0 255); do echo "b!     /dev/loop${i}  0600 root root  -   7:$((${i} * 8))" >> '"${LXC_ROOTFS_PATH}/etc/tmpfiles.d/lxc-required-setup.conf"'; done; for i in binder hwbinder vndbinder; do echo "L!     /dev/${i}  - - -  -   /dev/binderfs/anbox-${i}" >> '"${LXC_ROOTFS_PATH}/etc/tmpfiles.d/lxc-required-setup.conf"'; done; echo -e "#!/usr/bin/bash\n\nsetup_lxc_configuration(){\n\nmount -o remount,rw /sys/fs/cgroup\numount -Rl /sys/fs/cgroup/{schedtune,cpu,cpuacct,'cpu,cpuacct'} &>/dev/null\nrm -rf /sys/fs/cgroup/{schedtune,cpu,cpuacct,'cpu,cpuacct'}\nmkdir -p /sys/fs/cgroup/{cpu,cpuacct}\nfor cg in cpu cpuacct; do\n  mount -t cgroup -o rw,nosuid,nodev,noexec,relatime,\${cg} \${cg} /sys/fs/cgroup/\${cg}\ndone\nmount -o remount,ro /sys/fs/cgroup\n\numount -Rl /dev/binderfs\n\nrm -rf /dev/binderfs\nmkdir -p /dev/binderfs\nmount -t binder binder /dev/binderfs\n\n}\n\nsetup_lxc_configuration &>/dev/null || true\n" > '"${LXC_ROOTFS_PATH}/etc/rc.local"'; chmod +x '"${LXC_ROOTFS_PATH}/etc/rc.local"'; true;'

# If container stopped then umount the bind mounted rootfs and restore it's nosuid if it was set
lxc.hook.post-stop = bash -c "umount -Rl '${LXC_ROOTFS_PATH}'; true;"
lxc.hook.destroy = bash -c "umount -Rl '${LXC_ROOTFS_PATH}'; true;"- 登入Ubuntu,預設帳號ubuntu,密碼password
sudo lxc-start -F -n ubuntu-
參考Ubuntu chroot,安裝圖形環境。
-
透過virglrenderer達成GPU加速。