Note: because the Termux filesystem differs from ordinary Linux and has fewer packages, I tend to install a Linux proot container and run the desktop environment there. Although it is slower, the experience is better.
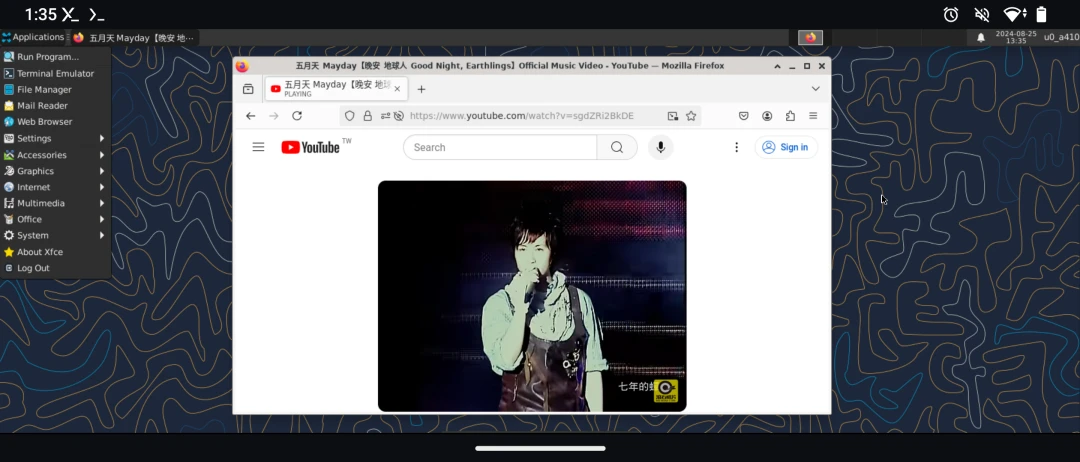
By default, Termux only has a text interface. Users can install a desktop environment themselves, then connect through VNC or Termux X11 to get a desktop-computer-like experience.
At present, desktop environments included in the Termux package repository include XFCE, LXQT, MATE, OpenBox, i3wm, Weston, and so on.
Termux can also use Android GELS to output audio, so we can run a PulseAudio server for audio output in the desktop environment.
This article explains how to install the XFCE desktop and configure the PulseAudio server.
1. Prerequisites #
To run a desktop environment, I recommend a phone with at least 6GB RAM.
Please install Termux first, and remember to disable Phantom Process Killing to prevent Termux from being terminated by the system in the background.
2. Install the XFCE desktop environment #
Termux does not package many desktop environments, so choose XFCE, which is lightweight but still sufficiently functional.
Install XFCE4, the Firefox browser, and the VIM editor:
pkg install x11-repo

pkg install xfce xfce4-goodies pulseaudio pavucontrol vim firefox
3. Connect to the graphical interface #
Choose one of the two; they can coexist. I recommend Termux X11, which performs better than VNC, but is less convenient for remote connections.
Termux X11 #
-
Configure Termux X11 and virglrenderer.
-
To make starting the desktop environment easier later, add a script
vim ~/startxfce4.sh- Fill in the following content:
#!/bin/bash

# Start GPU acceleration
virgl_test_server_android &

# Start audio server
pulseaudio --start --exit-idle-time=-1
pacmd load-module module-native-protocol-tcp auth-ip-acl=127.0.0.1 auth-anonymous=1

# Start desktop environment
termux-x11 :0 -xstartup "dbus-launch --exit-with-session xfce4-session" &- Grant execute permission
chmod +x ~/startxfce4.sh- Exit Termux.
exit-
Start the Termux X11 app
-
Return to Termux and start the desktop environment. The XFCE4 desktop will appear in the Termux X11 app screen.
./startxfce4.shVNC server #
-
Install the AVNC client on the phone
-
Install the TigerVNC package. The current version is 1.13.0.
pkg install tigervnc- Set the VNC server password
vncpasswd- Add the program to execute after the VNC server starts by editing
~/.vnc/xstartup
mkdir ~/.vnc/

vim ~/.vnc/xstartup- Fill in the following content
#!/bin/bash
unset SESSION_MANAGER
unset DBUS_SESSION_BUS_ADRESS

# Start the PulseAudio sound server; audio will come out from Termux
pulseaudio --start --exit-idle-time=-1
pacmd load-module module-native-protocol-tcp auth-ip-acl=127.0.0.1 auth-anonymous=1

# Run the desktop environment, XFCE here
exec startxfce4- Grant execute permission to xstartup
chmod +x ~/.vnc/xstartup- Define the VNC server configuration file. Edit
~/.vnc/tigervnc.conf
vim ~/.vnc/tigervnc.conf- Fill in the following content:
# Current session XFCE
$session="xfce-session";
# Resolution; higher values use more bandwidth
$geometry="1920x1080";
# Bit depth, values are 8/16/24/32; larger numbers look better but use more bandwidth
$depth="32";
# Allow external networks to connect
$localhost="no";-
Enter the
tigervncserverorvncservercommand in Termux to start the VNC server. Observe the port number output on the screen; it usually starts from 1. Since VNC server ports count from 5900, the port here is 5901. -
Open the AVNC app, add a host connection, enter
localhostfor the address, and5901for the port.
4. One-click desktop environment startup script #
Typing commands every time you start the desktop environment is too troublesome. Use a Termux Widget desktop shortcut to run the startup process for Termux + Termux X11 + virglserver with one click, automatically starting the desktop environment.
-
Install Termux Widget
-
Open system settings and grant Termux the “allow display over other apps” permission
-
Reopen Termux and enter the following commands to create a shortcut
mkdir .shortcuts

vim .shortcuts/start_xfce.sh- Fill in the following content
#!/bin/bash

# Terminate all old processes
killall -9 termux-x11 pulseaudio virgl_test_server_android termux-wake-lock

# Start Termux X11
am start --user 0 -n com.termux.x11/com.termux.x11.MainActivity
XDG_RUNTIME_DIR=${TMPDIR}
termux-x11 :0 -ac &
sleep 3

# Start PulseAudio
pulseaudio --start --load="module-native-protocol-tcp auth-ip-acl=127.0.0.1 auth-anonymous=1" --exit-idle-time=-1
pacmd load-module module-native-protocol-tcp auth-ip-acl=127.0.0.1 auth-anonymous=1

# Start the GPU-accelerated virglserver
virgl_test_server_android &

# Start the XFCE4 desktop environment
export DISPLAY=:0
export PULSE_SERVER=tcp:127.0.0.1
dbus-launch --exit-with-session startxfce4 &- Grant execute permission
chmod +x .shortcuts/start_xfce.sh-
Go to the phone home screen, add a widget -> select Termux Widget, and you will see the shortcut you just wrote appear in the list.
-
Tap the button, and Termux will automatically open and log in to the desktop.